基本配置
先装wget
1
yum -y install wget
新建自己的文件夹
1
mkdir sunyan
安装Anoconda
下载Anoconda。注意最新Anoconda的是3.7版本的,但是tensorflow还没有更新到3.7,这里我们安装2018年5月发布的python 3.6版本。
1
wget https://mirrors.tuna.tsinghua.edu.cn/anaconda/archive/Anaconda3-5.2.0-Linux-x86_64.sh
安装bzip2
1
yum install -y bzip2
安装Anoconda,一路yes即可。
1
bash Anaconda3-5.2.0-Linux-x86_64.sh
使能配置
1
source .bashrc
输入Python,查看是否配置正确

Conda安装TesnorFlow GPU版本
配置国内conda源。由于cudnn和cuda很大,conda又在国外,容易导致下载中断,这里我们配置国内中科大的镜像。
1
conda config --add channels https://mirrors.ustc.edu.cn/anaconda/pkgs/main/
安装
1
conda install tensorflow-gpu
我的cuda版本是9.0,cudnn版本是7.1.2,tensorflow-gpu版本是1.9.0。

安装NVIDIA驱动
安装gcc
1
yum -y install gcc-c++
安装Open JDK
1
yum install java-1.8.0-openjdk java-1.8.0-openjdk-devel
检测显卡驱动及型号
1
2
3
sudo rpm --import https://www.elrepo.org/RPM-GPG-KEY-elrepo.org
sudo rpm -Uvh http://www.elrepo.org/elrepo-release-7.0-2.el7.elrepo.noarch.rpm
sudo yum install nvidia-detect

这里显示的是Tesla P4,410.66 NVIDIA driver
去官网下载对应的驱动
1
wget http://cn.download.nvidia.com/tesla/384.145/NVIDIA-Linux-x86_64-384.145.run
屏蔽默认带有的nouveau,使用su命令切换到root用户下,然后修改/etc/modprobe.d/blacklist.conf 文件,如果系统没有该文件需要新建一个。
1
2
su root
echo -e "blacklist nouveau\noptions nouveau modeset=0" > /etc/modprobe.d/blacklist.conf
- 然后查看一下文件内容:
1
cat /etc/modprobe.d/blacklist.conf

重建initramfs image
1
2
mv /boot/initramfs-$(uname -r).img /boot/initramfs-$(uname -r).img.bak
dracut /boot/initramfs-$(uname -r).img $(uname -r)修改运行级别为文本模式
1
systemctl set-default multi-user.target
重新启动, 使用root用户登陆,这里需要等待一下,约1分钟。
1
2
sudo iptables stop
reboot查看nouveau是否已经禁用,如果没有显示相关的内容,说明已禁用。
1
ls mod | grep nouveau
安装kenel-devel
1
2
wget ftp://ftp.riken.jp/Linux/cern/centos/7/updates/x86_64/Packages/kernel-devel-3.10.0-693.17.1.el7.x86_64.rpm
yum install kernel-devel-3.10.0-693.17.1.el7.x86_64.rpm安装NVIDIA驱动,一路Enter即可
1
2
chmod +x NVIDIA-Linux-x86_64-384.145.run
sh NVIDIA-Linux-x86_64-384.145.run
测试
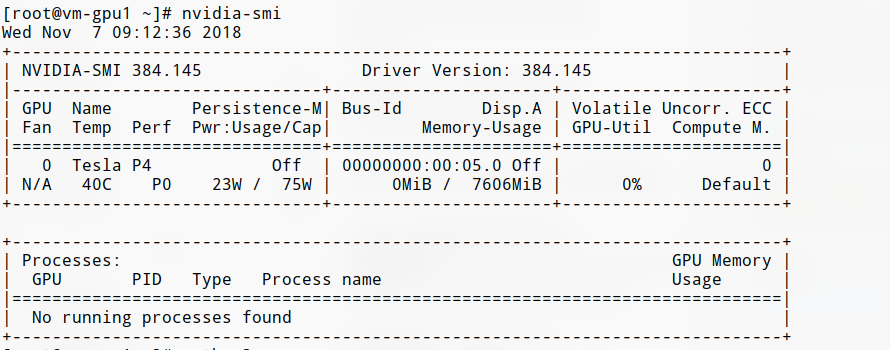
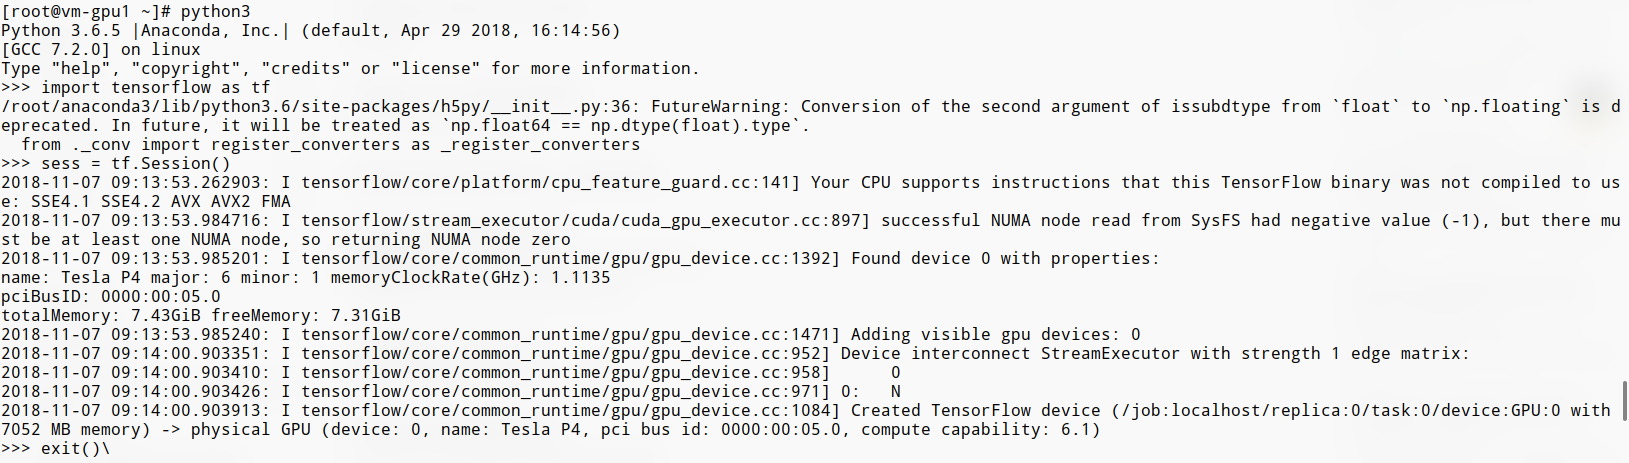
- nvidia-smi测试和TensorFlow测试,显示GPU信息即可。报警告没有关系,是TF本身的警告,也可以通过
pip install h5py==2.8.0rc1来解决。1
2
3
4nvidia-smi
python3
import tensorflow as tf
sess = tf.Session()
更换PyPi为国内源
1
2
3pip install pqi
pqi use tuna
pqi show更换conda源为国内源
1
2
3
4
5
6
7conda config --add channels https://mirrors.ustc.edu.cn/anaconda/pkgs/main/
conda config --add channels https://mirrors.ustc.edu.cn/anaconda/pkgs/free/
conda config --add channels https://mirrors.ustc.edu.cn/anaconda/cloud/conda-forge/
conda config --add channels https://mirrors.ustc.edu.cn/anaconda/cloud/msys2/
conda config --add channels https://mirrors.ustc.edu.cn/anaconda/cloud/bioconda/
conda config --add channels https://mirrors.ustc.edu.cn/anaconda/cloud/menpo/
conda config --set show_channel_urls yes
原文链接
感谢 sunyan 同学提供的文章!
Blog链接:https://sunyancn.github.io/